The Extension Methodology
In this section, we'll explain step by step how you can design and implement a data model that re-uses INSPIRE data specifications. We will focus on the methodological aspects, not on steps in concrete tools. You'll find an example of how to use tools in the End-to-End Tutorial Project.
| This section assumes you have basic knowledge of the terms and concepts used in INSPIRE. |
Process Phases
In your daily work, you will be confronted with requirements to use standardized data in order to fulfil a certain task. Such requirements often have a legal foundation, such as a European directive that requires monitoring and reporting. Examples for reporting directives include the Air Quality directive and the Marine directive. National legislation also often requires standardisation. As an example, the new Spatial Planning Act in the Netherlands mandates interoperability.
Even when no legal foundation requires the use of standards, building on interoperable data can yield huge efficiency gains. With the INSPIRE framework, you have a great starting point to develop interoperable infrastructures that fully cover your organisation's use cases. That is when extending INSPIRE is the way forward.
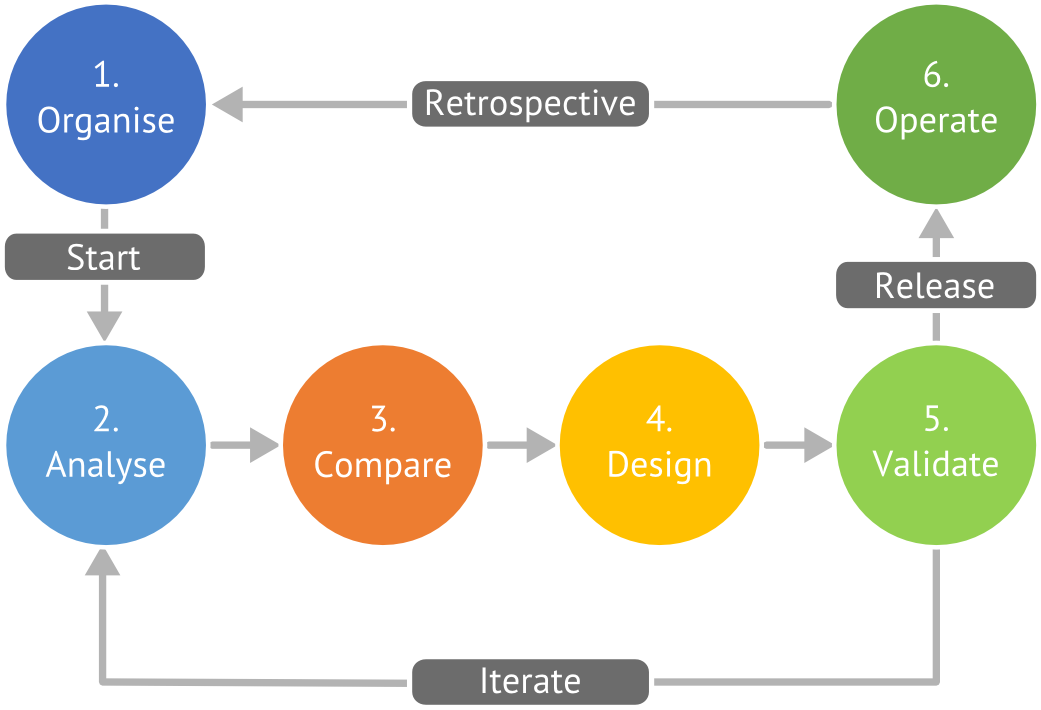
This section gives you an overview of the whole process, which has seven main phases:
- Organise: Build your working group, define your process and discuss work agreements
- Analyse: Identify and analyse requirements, evaluate existing models and the INSPIRE data specifications, prioritize work
- Compare: Compare the requirements with existing models and the INSPIRE Data Specifications
- Design: Create or modify your model extension
- Validate: Test and validate the model extension through implementation on the target platform, data integration, and usage
- Consult: Invite all stakeholders and the public to test and review the design based on the services created during validation
- Operate: Deploy and operate the model extension in view and download services
You will iterate over all of these phases multiple times. Typically, iterations that include a release will take weeks, while iterations where you design and implement features will take only minutes, hours or at most weeks:
Organisation and Working Agreements
First of all, you need to get organised. This means understanding who should be on the working group, distributing roles and responsibilities, setting work agreements, choosing tools, and more aspects. Let's start with you.
Who are you?
You will be the facilitator for the team that will design and implement the model. As you are hopefully not working alone, you do not need to be an expert at all required skills, but you should have the following skills:
- You are a good moderator
- You are a good technical writer who writes concise, easy to understand prose
- You have basic understanding of the domain the model should cover
- You understand basic modelling concepts such as classes and properties
If you join the team as a domain expert, make sure you assume a neutral role as a facilitator and moderator. Try to look at the domain with a new, fresh view. When you do so, you will be able to separate the domain requirements and the ‘way things work’ in the domain and are natural for the domain experts – and sometimes difficult to let go.
Your Team
Any data harmonisation projects needs people with a wide range of skills. A typical team size is 3-10 people, though larger teams occasionally form to define a model. When you build your team, make sure to have the following profiles on board:
- Supporting Stakeholder: These persons have organisational and policy-making influence and supports the project by providing required resources. They are essential to the long-term success of the project.
- Domain Experts: These people, like you, are experts in the domain to be modelled and know it well from years of hands-on work. They are familiar with the specific shared terminology, but every one provides a different perspective, e.g. from research and from data collection.
- Standards and Modelling Expert: This person knows ISO, OGC and ideally INSPIRE standards well and has very good knowledge of at least one schema language.
- Integration Expert: This person will help you to integrate actual data into the new model, by using data transformation tools such as XSLT, FME or hale studio (Open Source).
- Implementation Expert: This person knows all about specific tools used in the process, such as model transformation tools, modelling tools, databases and service publishing frameworks. Typically, they support many projects and support your activity part-time.

Work Agreements
Whenever you collaborate with a team, you need to clearly define the rules under which you will cooperate up-front. In agile software development, we call these rules work agreements. You should consider the following areas for work agreements:
- Roles: Does everybody in the team have the same responsibilities? Is one person responsible for monitoring the process and improving it, like a SCRUM master?
- Iterations: How long will your development iterations be? How many iterations will you go through in the team? How many limited or public releases will you make to gather feedback from outside the team?
- Documentation: How will you document the model itself, the process you're following and the decisions made during the project? Will others be able to use this documentation to emulate what you did?
- Capacity Building: How will you actively increase the capacity of your team? Will you identify skill deficits and address them through trainings or through pulling in advisors (internal or external)?
- Natural Language usage: Will you develop the model in English or in your local language? Will you provide translations?
- Meetings: How often will you be able to meet in person or online? How do you get the most our of such meetings?
- Communication: How often will you be able to meet in person or online? How do you get the most our of such meetings? How do you communicate asynchronously?
- Change Management: How will you deal with external changes, such as new INSPIRE data specification versions, new version of regional standards, or a change in your technical requirements?
- Time and commitment: How long will the project go? What level of commitment will you get from each of the involved team members?
- Working Environment: How do you decide which tools and technologies to use?
If you decide to translate the INSPIRE data specification to your spoken language, make sure to check out the INSPIRE Feature Concept Dictionary. It contains all the domain terms used in INSPIRE and provides translations for all official languages of the EU.
Working Environment and Tools
It's also helpful to agree on a set of tools that everybody uses, to reduce interoperability challenges inside the team. Take into account previous experience, available licenses and suitability for the project at hand. Typically, you will need the following types of tools:
- Project Management: A place where you track tasks, progress, documents and other artifacts related to the project. It should be easy to access and to use. Typical products used for this purpose include Jira, Redmine (Open Source) or Github and Gitlab.
- Communication: A central place for all communication can be incredibly helpful for documentation and understanding how a project developed. This archive should be searchable and easily accessible. Typical choices include a mailing list, or tools like HipChat or Slack.
- Source Code Management: You will benefit greatly from using a proper source and version control repository for your model from the start on. Such tools enable effective cooperation even in larger or distributed teams and allow you to review progress, and they have become much easier to use thanks to sites like Github. The three most common tools are Mercurial, Git and Subversion (SVN). Which one you use will depend on the modelling software you use.
- Data Modelling: The tool you use to design the actual model extension. Use an UML Editor such as Enterprise Architect or ArgoUML (Open Source).
- Model Validation:ISO/TC211 provides Enterprise Architect Model Validation Scripts you can use to test your model's compliance to the ISO guidance on which INSPIRE data specifications are built.
- Schema Generation: When you design your model in a conceptual language like UML, you need to transform it to an implementation language before you can actually use it. While some of the data modelling tools listed, like Enterprise Architect, have such capabilities, you will need a specific schema generation tool to generate valid INSPIRE GML Application Schemas. For that, there is a specific tool: ShapeChange (Open Source). If you absolutely need to edit the generated XML Schema or extend a code list later in the process, you can do so in any programmer's text editor. There is also specialized software available such as XMLSpy.
- Data Transformation: Your model under design needs to be tested, and that can only be done meaningfully by filling it with data. This process, also known as transformation testing, is done with data transformation software, sometimes also called ETL (Extract Transform Load). The most commonly used products for this purpose are XSLT, FME and hale studio (Open Source).
- Service Publishing: At the end, a successful implementation extending INSPIRE requires you to set up view and download services, and you will need to test your model extension by deploying such services. There are several options available for publishing services using the GML Application Schemas, such as deegree (Open Source), GeoServer with app-schema (Open Source) and ArcGIS Server with XtraServer.
- A GIS client: You will use this software to analyse both the source data and transformed data. Since INSPIRE uses complex feature GML as a base, it is challenging to use in desktop GIS. Some GIS software does have limited complex features GML support, such as QGIS (Open Source).
Requirements Analysis
After getting organised, it is time to scope the project in detail and to decide what exactly needs to be done in which order. The core activities in this phase revolve around the identification and analysis of requirements from the national and European level. The objective of the analysis is to understand how the model will be used by its future stakeholders and what they really require. You will also define metrics that you can use to measure progress during the project, and to assess successful completion. We recommend a structured user-centered approach to the analysis, with the following steps:
- Scope Analysis
- Stakeholder Identification and Persona building
- Scenarios
- User Stories
- Technical Requirements
Personas, scenarios and user stories are all related to each other, and help getting a clearly motivated, consistent picture of the requirements, without getting lost in details too early in the process:
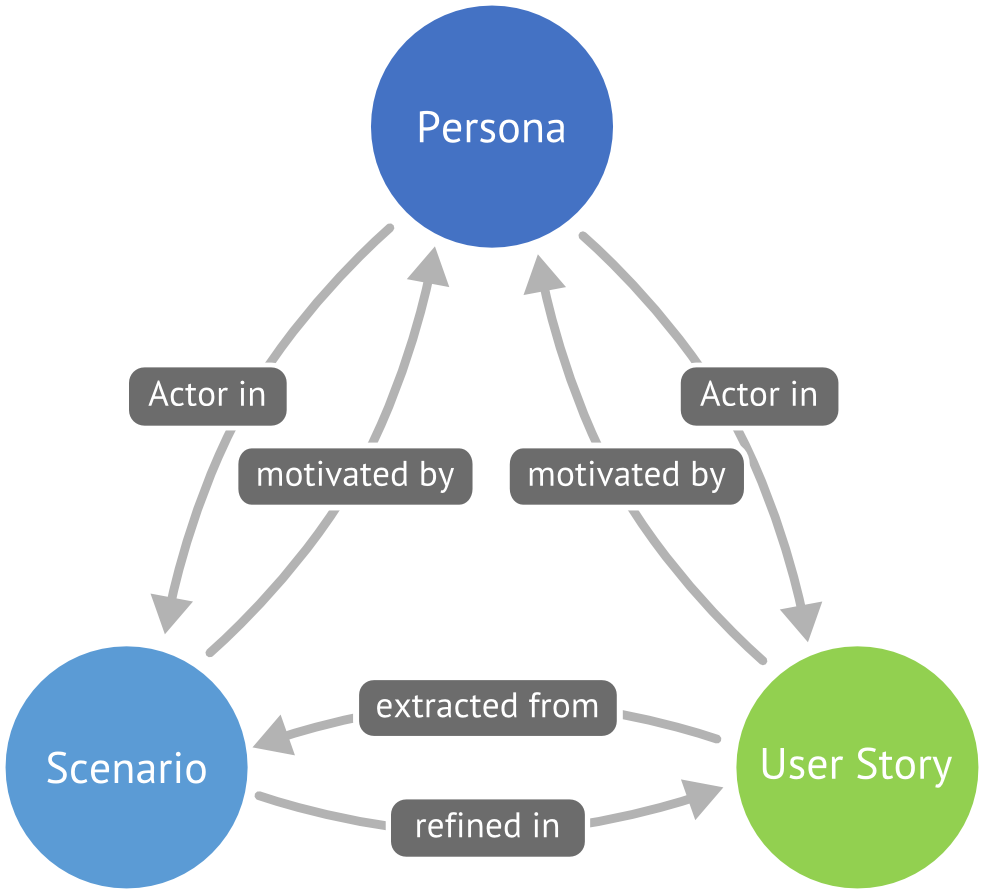
The following sections will explain how to work with these to define a fit for purpose data model.
Scope Analysis
In a first step, write down the trigger business case that initiated the process. Try to describe the full case without going into the details. Then, gather all relevant documents that define what you need to do. These might be legal texts such as implementation regulations, or technical texts created by specialist departments. They also include relevant INSPIRE documentation that falls into the same thematic area like your trigger business case. If there are no texts to draw upon, ask each of the domain experts in your team to describe their current or envisaged workflows in detail, similar to the scenario described below.
To identify statements relevant for your data model, perform a so-called Lexical Analysis. Find nouns that describe spatial objects or their properties in their story telling and the documents gathered. Clearly mark what is required and what is optional. Consider the following example, where all relevant nouns are marked bold:
The responsibility for registering applications relating to land rights including ownership, mortgages, burdens and easements rests with the Land Registry...
In the end of this process, you should have a list of data elements you will need to include in your model. The next step is sort this list, so that the most important and high-business-value items are at the top of the list. This list – often also called a backlog -– could look like this:
-
Object type: Ownership Registration
- Property: Date of submission
- Property: Submitting legal entity
- Property: Owner legal entity
-
Object type: Mortgage
- Property: Date of submission
- Property: Submitting legal entity
- Property: Land record Identifier
- Property: Additional securities
Personas
One of the first steps to build a model extension is to identify its future stakeholders. Who will be working directly with data in that model? Who will be affected by analysis and decisions made on that data model? Make a list of the individuals you know that are going to be directly or indirectly affected by your work. Group them by function, skills and needs. Then, build between one and three so-called personas based on the most important stakeholder groups. A persona defines an archetypical user of your data model. The idea is that if you want to design effective systems, they need to be designed for specific people. In other words, personas represent fictitious people which are based on your knowledge of real users. Here is an example persona:
- Name: Angela Müller
- Position: Team Lead Geoinformation for the County Müllerhausen
- Education: M.Sc. Geography
- Technical Knowledge: ArcGIS (+++), Excel (+), Word (+), JIRA (+), Git (+), Python (++), UML (+)
Scenarios
A scenario is a narrative that tells how one specific persona will work with the data. The scenario also explains why that persona executes the workflow. It explains one specific workflow, without variants, from end to end, and uses the persona's vocabulary. The scenario should contain at least some of the object types and properties you have identified in the scope analysis. Consider this example scenario:
Angela needs to publish an updated version of the Ownership Registrations data set she is responsible for, because her colleague Mark needs the new data which contains additional information on submitters to implement a new and improved internal administrative process. She logs in to the system, goes to the data sets list, identifies the one she wants to update, and clicks on it. She goes to the files tab and deletes all files, then uploads the new files. She waits for a moment until the system tells her all files are valid, then the proceeds with metadata entry. After that is done, she triggers the service update. She notifies her colleague Mark.
User Stories
A User Story describes the "who", "what" and "why" of a requirement to a software system in a simple, concise way. It may consist of one or more sentences in the language of the end user. User stories originate from agile software development methodologies as the basis for defining the functions a business system must provide. A simple example for a user story is:
As a data manager, I must be able to upload a GML file to create a predefined dataset download service.
This single sentence identifies the actor (stakeholder), what they need to do (upload a file) and gives the reason why the functionality is required. The sentence also contains a key word that indicates the business value of the requirement. In the example, it's must, the strongest of the three keywords commonly used, the other two being should and could. User stories can also serve you well when creating a data model, such as in this example:
As a data manager, I must be able to combine multiple land parcels into one land parcel, without loosing records of the individual parcels.
This requirement provides a basis for several elements of your data model. A solution to implement this requirement might be to add a class JoinedParcel to manage parcel joins, and to give it a reference to a Set of Parcels, to satisfy this requirement.
A User Story is often more than just a single sentence. Often, the user story needs to be clarified with additional information, such as...:
- Unique Identifier: A short ID and/or description we can use to reference to the use case, such as «IE-12 Join Parcels».
- Definition of Done (DoD): A single sentence leaves a lot open to interpretation. The DoD is used to define exactly when the user story is fulfilled. In the GML upload example above, the DoD might read that GML 2.1.x and GML 3.x need to be supported, that files up to 100MB need to be uploaded, and that the system needs to validate files on upload. You can even specify a set of files with which the upload has to work.
- Design: In some cases, the user story will need a design, e.g. for a user interface or for a data model. Often this design is a draft or a wireframe, not a pixel-perfect final design.
- Preconditions: Describes the state the system needs to be in before the action. Typical preconditions include authentication or execution of a successful process.
- Postconditions: Describes the expected output of the action, such as a newly created file being provided to the user for download.
Comparison with INSPIRE and other Data Specifications
Your User Stories, by intent, don't describe the actual data model in detail. If you first create a data model based on the user stories and then compare your model to the INSPIRE data specification, you will have a much harder time to reconcile the two. Instead, we compare the INSPIRE data specification to the User Stories and see which parts of it are already covered.
Find your INSPIRE Scope
You have three options to understand which INSPIRE Data Specifications are relevant for your model extension. Initially, interested people had to either read through hundreds of pages of PDFs, or to analyse the Enterprise Architect UML files. Thanks to the hard work of the IES team at the JRC, we now have a third option available. The INSPIRE Interactive Data Specifications. This online application provides two tools:
- Read and Compare Technical Guidelines: An index that present the Data Specifications in smaller chunks, and enables side-by-side comparison of different themes. This is useful when you want to determine which data specification is relevant.
- Find Your Scope: An interactive workflow to identify relevant Spatial Object types in the INSPIRE Data Specifications. You can use this to find out which INSPIRE Data Specifications are relevant for a dataset you’d like to contribute to the infrastructure. The «Find your Scope» tool at the end provides you with either documentation (*.doc, *.pdf), a mapping table (*.xls), or as a hale studio mapping project. This project makes it easier for you to get started with producing INSPIRE interoperable data.
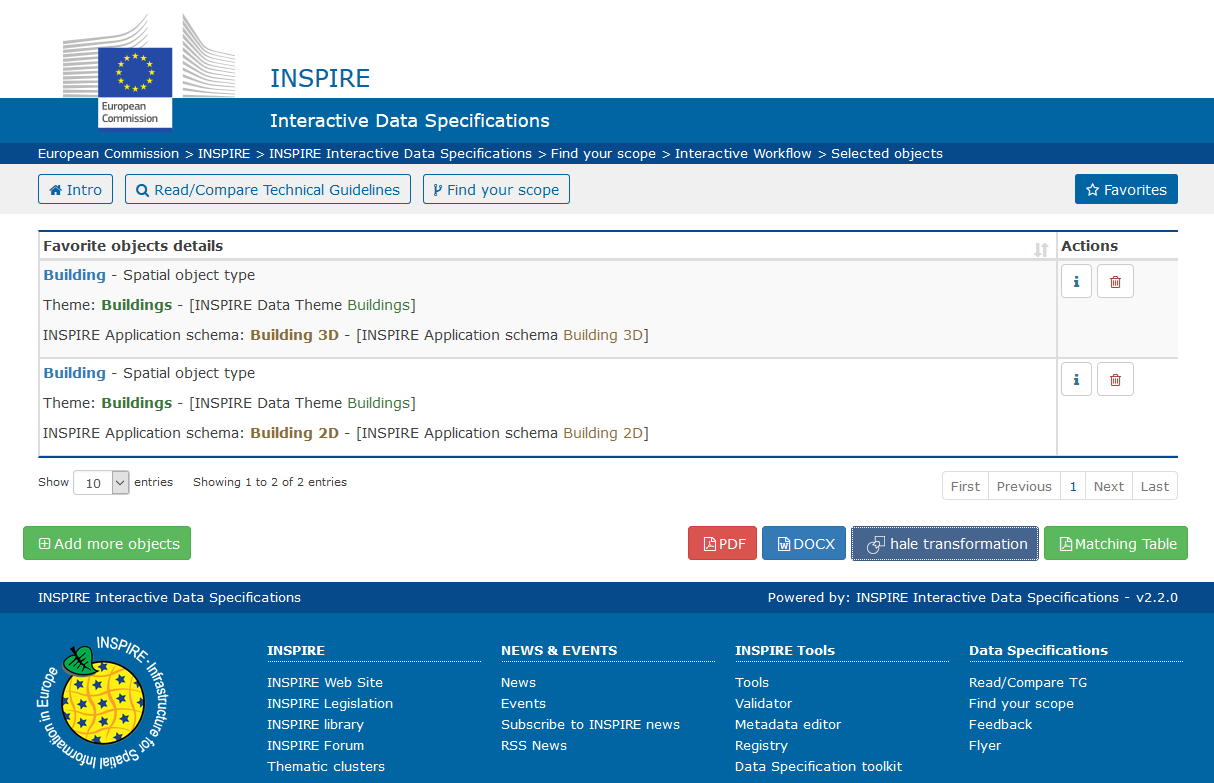
These tools will help you identify which themes, schemas and spatial object types are relevant for your model extension. Export the list of relevant object types as a document and a mapping table for later work.
| Make sure you also take a look at the Model Extensions Inventory to see if there is an extension you can re-use entirely or use as a blueprint for your work. |
Validate requirements coverage
Let's pick up the example from above again and compare that to the INSPIRE Cadastral Parcels data specification. In that specification, you'll find this diagram:
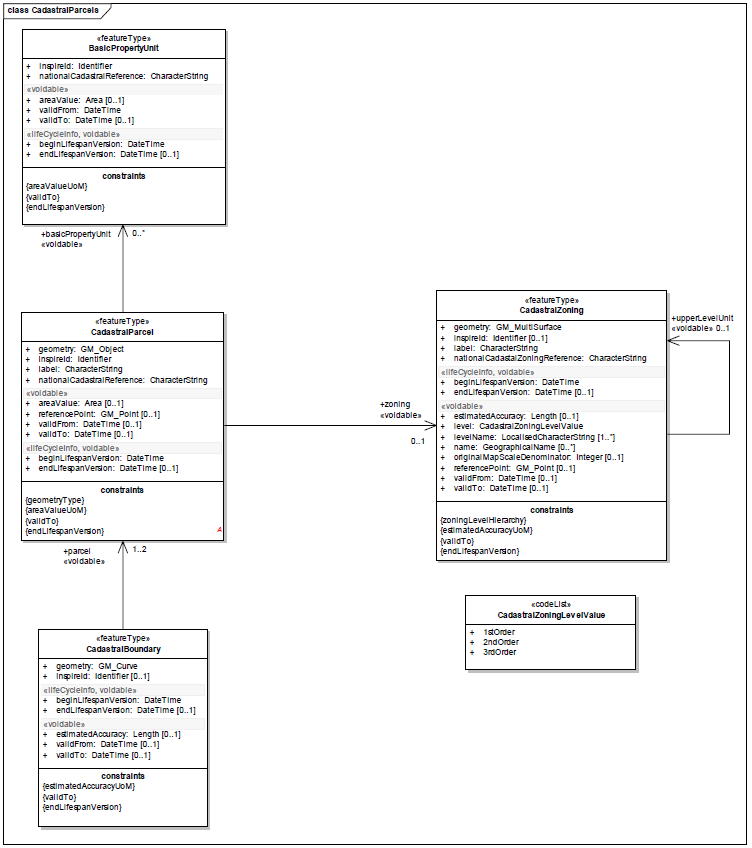
Looking at the data model in detail, there doesn't seem to be a way to cover the parcel join use case with the given data structure. We do however have a CadastralParcel class that might serve as a baseline and connection point to the INSPIRE model. Compare each of your User Stories to the INSPIRE data specification, and build a comparison table similar to this one:
| User Story | Covered | Not covered |
|---|---|---|
| IE-12 Join Parcels | The local class Parcel can be matched to the INSPIRE class CadastralParcel. We can use beginLifespan and endLifespan properties to indicate when a JoinedParcel is formed, and when the individual Parcels stopped existing as individual objects. | The INSPIRE class CadastralParcel has no reference to a set of CadastralParcels that it was made of. |
| IE-14 Split Parcels | The local class Parcel can be matched to the INSPIRE class CadastralParcel. We can use beginLifespan and endLifespan properties to indicate when a new Parcel is formed, and when the individual Parcels stopped existing as individual objects. | The INSPIRE class CadastralParcel has no reference to a CadastralParcel of which it was split off. |
The table uses tentative class names for the missing classes based on the results of the lexical analysis done earlier. Your class names should follow a common naming convention. In INSPIRE, we use CamelCased, singular, composite English class names.
Compare with existing models
In many cases, you already have one or multiple existing local data models - after all, you have been managing parcels or other geospatial objects in the past. When you have such a local data model, perform the same exercise as before. This time, compare the requirements to the local data model, resulting in a second coverage table.
| All your requirements are covered by the existing INSPIRE Data Specification? Great, you can directly proceed to the Testing section! |
Designing the Model Extension
Finally, it's time to design the actual data model. For the initial design, we want all domain experts in the group to give equal input. For this reason, you should ask all domain experts to create a draft design in parallel. You will likely go through several iterations of this draft model very quickly, so use easily accessible tools such as Pen and Paper or whiteboards. UML or XSD editors are best used after the model becomes more stable.
Rules on INSPIRE Model Extensions
The INSPIRE Generic Conceptual Model (GCM) provides the data specification drafting teams and everybody who wants to create related data models with a common framework. The GCM also contains an annex that gives rules how to create an extension to an INSPIRE application schema. You need to consider these rules as a baseline; whatever you model as part of your extension project, you have to fulfill the rules as defined below to produce a valid INSPIRE Extension:
- The extension does not change anything in the INSPIRE data specification but normatively references it with all its requirements, such as the Guidelines for the encoding of spatial data
- The extension does not add a requirement that breaks any requirement of the INSPIRE data specification, in particular those defined through the ISO 191xx standard and through the UML profile for INSPIRE
You may do any of the following in an INSPIRE Extension according to the GCM:
- add new application schemas importing INSPIRE or other schemas as needed
- add new types and new constraints in your own application schemas
- extend INSPIRE code lists as long as the INSPIRE data specification does not identify the code list as a centrally managed, non-extensible code list
- add additional portrayal rules
The Design process
The design phase has the following steps:
- Choose what Model Compatibility patterns in addition to INSPIRE you want to apply
- Create your new Model
- Choose a Class Extension pattern to define how this new class should be linked to any INSPIRE class
- Create required new classes
- Choose a Property Extension pattern to define how properties in the new class should be linked to any INSPIRE classes or properties
- Add required properties to new classes, including constraints such as the allowed cardinality, adding the
nilReasonattribute and setting thenillableflag - Add external constraints or extend code lists
- Validate that your model does not violate any of the model extension pattern's rules, to ensure compatibility with INSPIRE Data Specifications
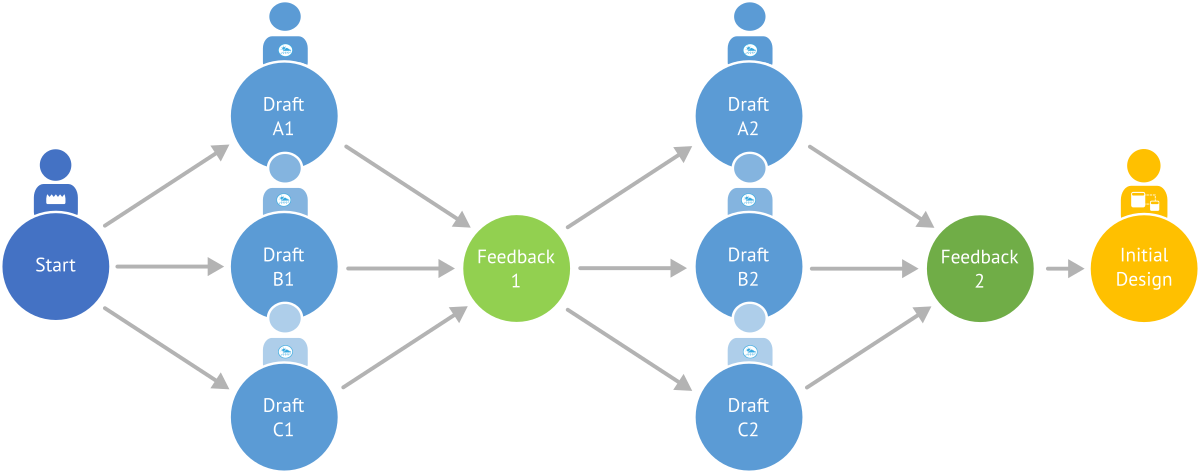
When each of the domain experts has finished their model draft, the next step is to compare and merge model designs. Proceed as follows, with each domain expert going through the following routine:
- The domain expert presents their model draft briefly (one to three minutes)
- Each of the other domain experts provides brief feedback (one minute) on things that should be kept (likes) and things that need to be improved (dislikes)
After all the domain experts have presented their model, the collected likes and dislikes should form the basis for a second draft model. If there are no major points of contention, the project lead uses the feedback and draft models to build the initial model.
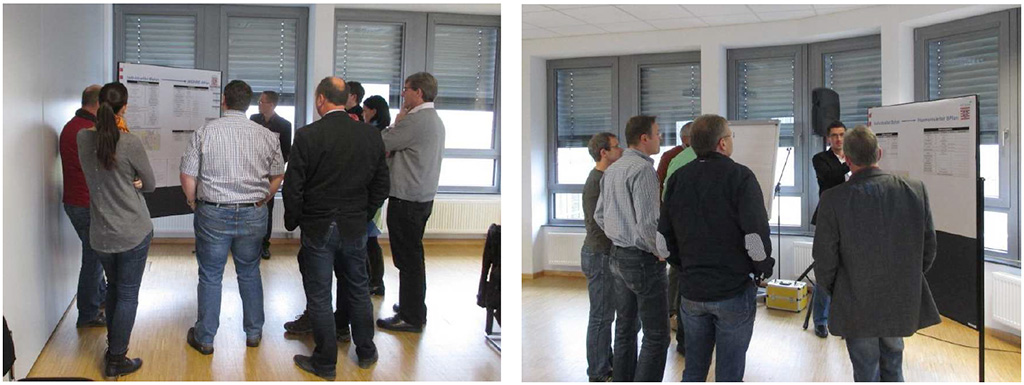
In later iterations, you may reconsider one of the choices made regarding the pattern type. Example: You find that in implementation, a Class Extension pattern you chose creates unexpected problems, so you go back and shift to a different pattern.
| When you design a large model with more than 8 to 10 new classes, you can improve model organisation by creating packages. Group classes that are closely related together in such packages. To work on such large models, create the draft design and initial model for each of these packages one at a time. |
Creating the implementation level model
After your team has agreed on the conceptual design, you need to create a platform-specific model, most likely with help from the modelling expert and the integration expert. You will need one or more of the following implementation-platform-specific models:
- GML application schema:
- What is it? The default implementation format for interoperable INSPIRE data is the Geography Markup Language (GML). GML is in turn built on the eXtensible Markup Language (XML). What sets XML apart from many other formats is its rich schema language, called XML Schema Definition (XSD), which allows to define structures, constraints, types and many other kinds of schema definitions.
- Why do you need it? A GML schema enables you to create compliant download services and interoperable data sets. GML Application Schemas are the only formlaied definitions for INSPIRE. If you decide to use a different schema language to provide services, you will have to prove that you still fulfill all INSPIRE requirements.
- Relational Database schema:
- What is it? Most structured data is stored and maintained in relational databases. Relational databases organise data into one or more tables (or "relations") of columns and rows, with a unique key identifying each row. The Relational Database schema describes the name of each of these tables, as well as the name of each column, its data type, and constraints that the system should enforce.
- Why do you need it? A database schema enables you to create a data management backend without mismatches to the download service's model.
- Document Store schema:
- What is it? An alternative to relational database systems that operates with a more flexible approach to data structures. The model is usually far less expressive than a GML Application Schema or a Relational Database schema, but enable you to define collection names, document attributes, indices and some constraints.
- Why do you need it? A document store enables you to effectively store objects with different structures and to retrieve them with very high performance.
- Generated Domain Class Model:
- What is it? For most programming languages, there are ways to express the structure of the domain model. In Java and most object-oriented languages, you use classes. Generated classes provide a starting point for an implementation with custom business logic.
- Why do you need it? Build you own processes and analytics on a domain model that matches the conceptual model.
Tools such as Enterprise Architect and ShapeChange allow you to create many different types of platform-specific models. The End-to-End Tutorial projects provides more detail on one possible way to create a platform-specific model - in particular, a GML Application Schema.
| Even though you can achieve a high degree of automation when deriving the platform-specific model from the conceptual model, manual editing after generation is quite common. |
Validation of the Schema
When you've generated the logical schema, make sure you validate it against the requirements of a GML Application Schema. As part of the CITE toolbox, the OGC provides a service that allows you to validate your schema.
Testing and Integration
Now that you've created the platform-specific models, it's time to put them to the test. The goal of this phase is to see whether you can implement the model as designed or whether some unforeseen problems pop up. The two main areas we'll be looking at are data integration and data publishing.
Data Integration
Data integration allows us to see how the platform-specific model actually works when we fill it with real-world data. For this activity, which is also often called transformation testing, we need to choose a set of existing, representative data sets, and then match and integrate them with our new INSPIRE extension model.
After you've identified the source data sets you'd like to integrate, the first step is to create a mapping between the source data model and the new INSPIRE extension model. Similar to the initial data model design, make use of the domain experts in your group and ask each of them to create a mapping, which you can then merge. To create such a mapping, you have a choice between two approaches.
The Matching Table Approach
A Matching table is a spreadsheet document that relates elements of the target model to elements of the source model by arranging them next to each other. All you need for this is Microsoft Excel and a template document. You can get custom templates from the INSPIRE Find Your Scope tool.
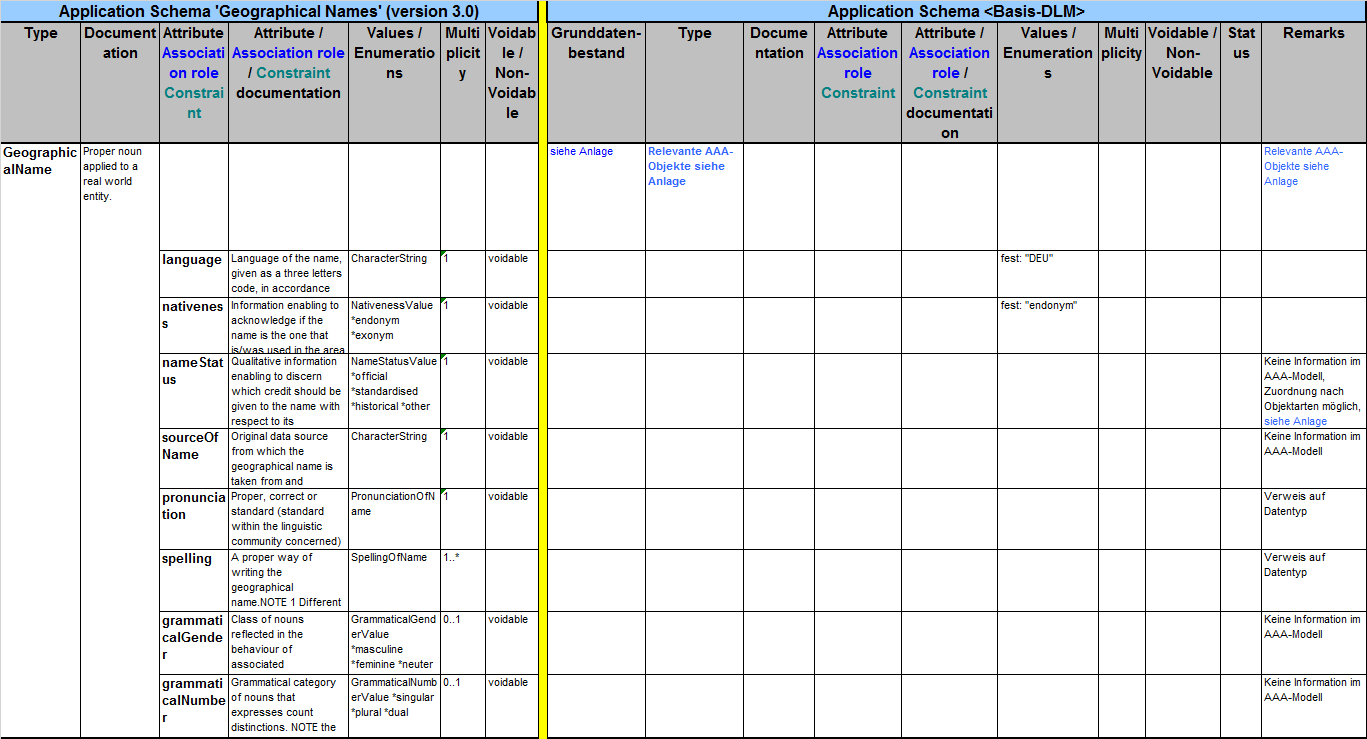
Such matching tables are an informal definition of a transformation. As you put in free text and can define any relation, matching tables allow you to specify any kind of relationship between source and target model elements. As a result, matching tables are good for capturing intent, but usually require interpretation for the actual data integration. Furthermore, when matching complex models, these tables get really big and complicated, as you will rely on manual lookups a lot.
After creation of the mapping table, the next step is to implement the transformation, which is the integration expert's main responsibility. The expert will typically use tools such as XSLT, FME or hale studio for this purpose.
The Declarative Mapping Approach
A declarative mapping consists of a number of relations, where each relation links one or more source data model elements to one or more target data elements via a defined function. In the easiest possible way, you can just use pens and paper to create such a declarative mapping.
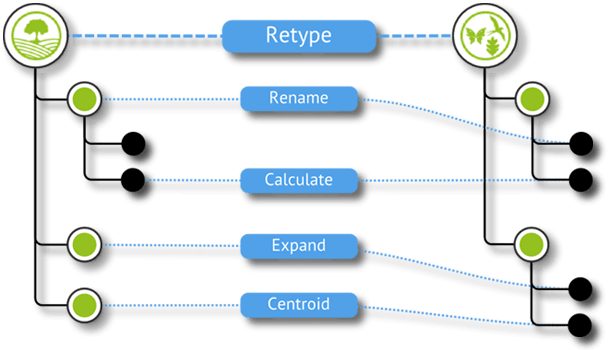
There are also a number of specific tools available for the creation of declarative mappings, such as Altova MapForce (which works with XML only) and hale studio (Open Source, works with XML, databases and many file formats). Declarative mappings created with such tools are executable and formal, which means you can use them to directly create data compliant to the target data model.
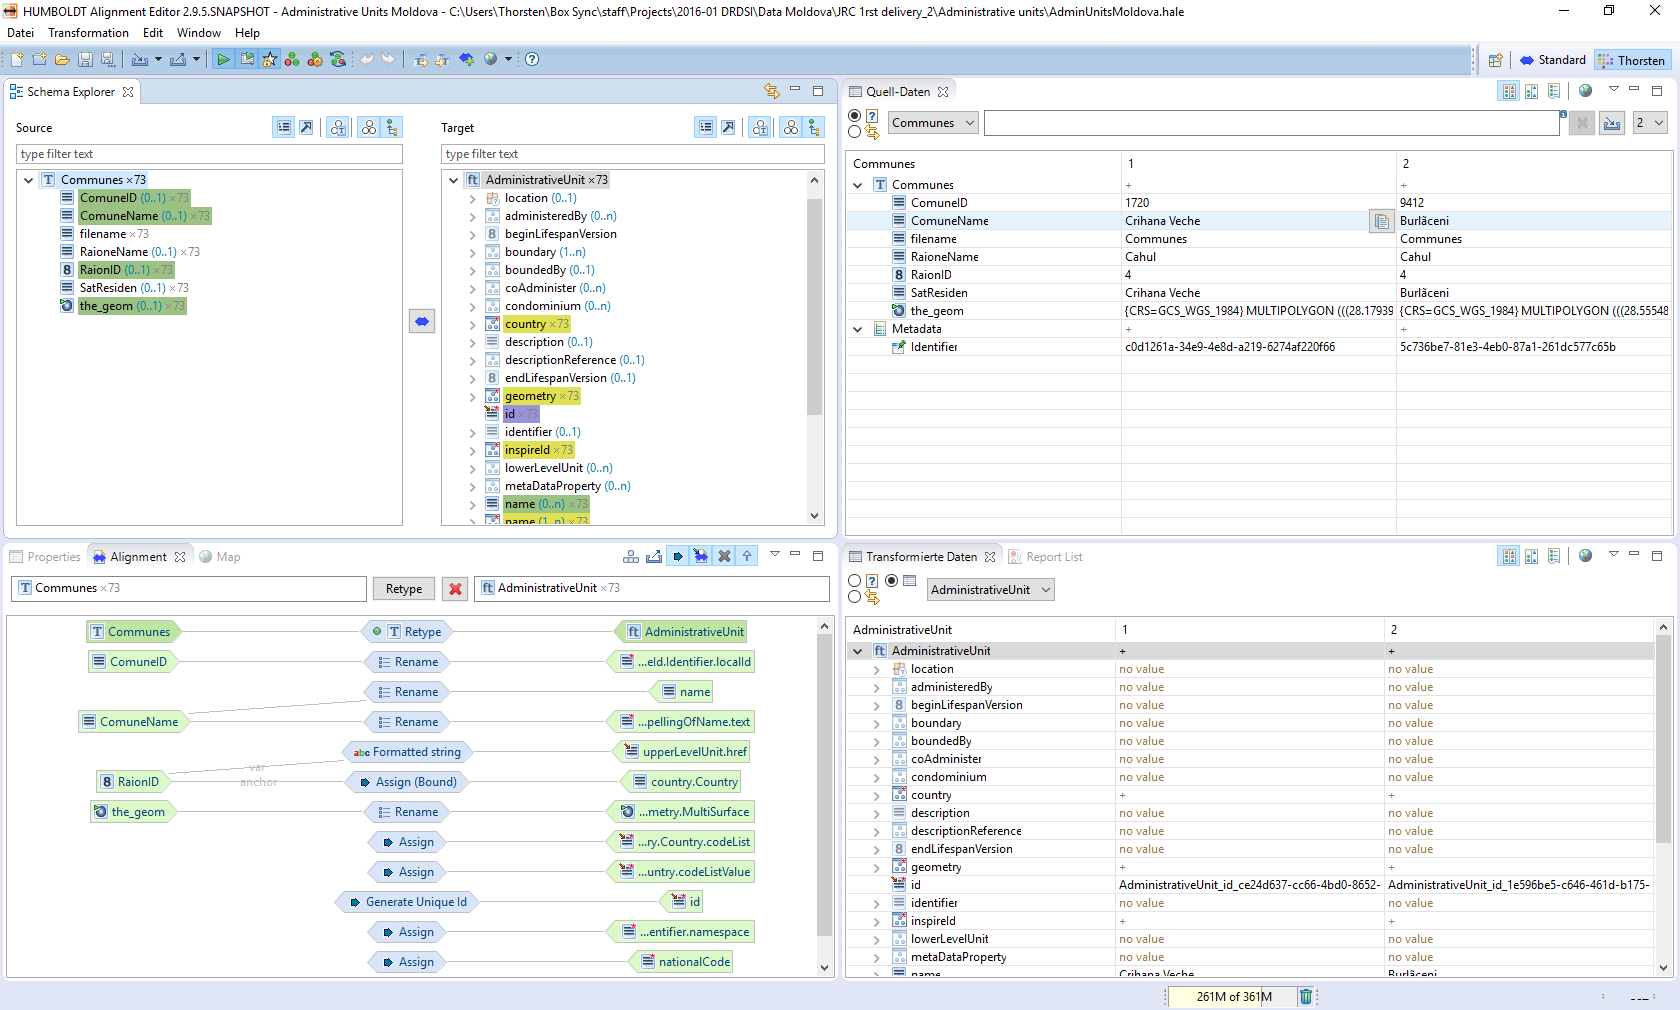
Except for the pen and paper approach, all of these tools have a certain learning curve and some limitations regarding what and how data can be transformed, so they might limit you in the discussion. On the other hand, you will be aware of such implementation limits sooner and can work on mitigation strategies.
Analysis of the transformed data set
After you've created the transformed data sets, you should analyse and measure them. Your goal should be to determine key properties and to set goals on how to improve these indicators in the next versions. Some example indicators include:
- Data Size: How large is the resultant file or database? How many elements does it contain? What is the ratio between content data volume and structure data volume?
- Model Complexity: How large is the model itself? Does it have very deep inheritance or aggregation structures? Does it have large loops?
- Conceptual Mismatches: How well did classifications, ranges, geometry types and numeric values match?
- Model Coverage: How much of the source data were you able to bring into the target model? Did parts of the target model remain empty, or get used only very rarely?
Data Publishing
In the end, we need to give stakeholders access to the data sets we've created, using our new logical schema. One way to do this is to provide INSPIRE compliant network services. Providing an INSPIRE compliant service has the advantage that you can cover requirements for INSPIRE with the one system, instead of having a separate infrastructure. We have to make sure we can publish the data we've integrated using our new data model. There are several products available for publishing INSPIRE-compliant view and download services, each with slightly different capabilities regarding INSPIRE support. In the end-to-end tutorial, we'll explore one option for data publishing in detail.
What most of these products have in common is that there are three ways of how to get your data from the previous step published:
- Insert via service interface: Some products, such as deegree, offer an INSPIRE compliant transactional WFS interface (WFS-T). With a WFS-T interface, you can send compliant GML to the service, which will handle storage and management of the data.
- Insert into backend database: All products support providing data from a database backend to a WFS (Download Service) interface. To make this work, you will need to import data into the database. Some databases have specific tools, e.g. for importing shapefiles, but usually you will use an ETL tool such as FME or hale studio to directly write to the database.
- Serve from files: An easy way to create INSPIRE download services is to directly serve files, as created previously. This approach is called a Predefined Dataset Download Service
Another key component to setting up a compliant INSPIRE service is to add metadata to the data sets and services. We will not touch on that topic in depth here.
When everything is set up, you're ready to test the service, and through it, your INSPIRE model extension. Testing is usually done manually, through accessible services in client software or systems, but can also be automated. There are various tools available for testing, such as the German GDI-DE testsuite, the Geonovum Validator, the Validation Service provided by the OGC and by Epsilon Italia, or the monitoring dashboard provided by Spatineo.
Transition to operational usage
Alright, you're satisfied with your services and data model after internal testing and analysis in your working group. One step remains - to see how other stakeholders react to the design. In this phase, you should publish your first model and perform a public consultation.
During this phase, make sure to collect feedback from the users of your data sets or network services. Ask them how the new data model helped or hindered them in their business processes, collect these inputs as new requirements similar to the User Stories and use them to do another release iteration. We recommend to do at least two release iterations (e.g. Alpha and Beta) before calling the model ready for production.
You should also use this public consultation phase to perform scalability and load testing to see how the design behaves under the load of continued production or beta usage for a while. Quite often, you'll find that a model that performed well for a small amount of data might not work well anymore for large amounts of data.
You've reached the end of this process, congratulations! Let the community participate and submit your model extension to the inventory!